
I recall the day when my accountant informed me of QuickBooks halting due to Error 7300. It was concerning as QuickBooks is vital for our business. Despite searching online, existing guides were unclear. Thus, I decided to create a comprehensive guide.
QuickBooks Error 7300 occurs when accessing company data files, often during Windows setup. It disrupts QuickBooks functionality, risking crucial data. Its causes include Intuit Sync Manager failure, damaged files, and incomplete installation.
Troubleshooting involves tailored steps for different Windows versions:
Windows 7:
- Open Control Panel, select Programs and Features.
- Uninstall QuickBooks.
Windows 8:
- Navigate to Control Panel, select Programs and Features.
- Uninstall QuickBooks.
Causes for QuickBooks Error Code 7300
To effectively tackle this issue, it’s imperative to grasp the underlying causes:
- Intuit Sync Manager Malfunction: One of the primary culprits behind QuickBooks Error 7300 is the failure of the Intuit Sync Manager. This integral component, when malfunctioning, can trigger a cascade of errors, disrupting the seamless operation of QuickBooks.
- File Corruption: Another common trigger for QuickBooks Error 7300 is the corruption of essential QuickBooks files. Whether due to accidental deletion, system errors, or external factors, the integrity of these files is compromised, leading to system instability.
- Incomplete Installation: In some instances, QuickBooks Error 7300 can be attributed to an incomplete installation process. Failed installations or improper configurations can leave the software vulnerable to errors, hindering its functionality.
Solutions to resolve QuickBooks Error Message 7300:
Now, armed with a deeper understanding of the root causes, let’s delve into the solutions to mitigate and ultimately resolve QuickBooks Error 7300:
Solution 1: Backup Registry Entry
Creating a backup of the registry entry associated with QuickBooks Error 7300 serves as a proactive measure to safeguard against potential data loss and system instability. Here’s how to execute this solution:
- Begin by navigating to QuickBooks Online Backup from the search bar, ensuring you’re logged in with administrative privileges.
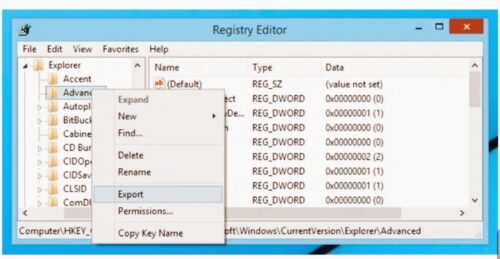
- Press the Ctrl+Shift keys simultaneously and enter “Regedit” in the dialog box that appears, followed by hitting the Enter key.
- This action launches the Registry Editor interface. From here, locate the registry entry associated with QuickBooks Error 7300.
- With the registry entry highlighted, select the “Export” option to initiate the backup process. Choose a secure location to store the backup file, ensuring it’s easily accessible for restoration purposes.
By creating a backup of the registry entry, you establish a safety net against potential data loss and system instability, providing peace of mind in the face of QuickBooks Error 7300.
Solution 2: Reinstall QuickBooks
In cases where QuickBooks Error 7300 persists despite exhaustive troubleshooting efforts, a complete reinstallation of the QuickBooks software may be warranted. While this solution may seem drastic, it often proves to be the most effective method for resolving persistent errors. Here’s a detailed breakdown of the steps involved:
Uninstall QuickBooks:
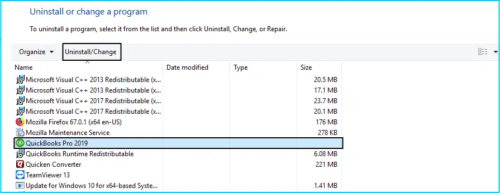
Begin by navigating to the Control Panel on your Windows system and selecting the “Programs and Features” option.
- From the list of installed programs, locate QuickBooks and initiate the uninstallation process. Follow the on-screen prompts to complete the uninstallation, ensuring all associated files and components are removed from your system.
Rename the Intuit Folder
Following the uninstallation of QuickBooks, it’s essential to rename the Intuit folder to prevent any residual files or configurations from interfering with the reinstallation process. To accomplish this:
- Navigate to the directory containing the Intuit folder, typically located in the Program Files or Program Files (x86) directory on your system.
- Right-click on the Intuit folder and select the “Rename” option from the context menu. Append a unique identifier to the folder name to distinguish it from the original.
Reinstall QuickBooks:
With the Intuit folder renamed, you’re now ready to initiate the QuickBooks reinstallation process. Follow these steps to reinstall QuickBooks:
- Begin by downloading the latest version of QuickBooks from the official Intuit website or your preferred authorized vendor.
- Once the download is complete, double-click on the installation file to launch the QuickBooks installer.
- Follow the on-screen prompts to proceed through the installation wizard, carefully reviewing and accepting the license agreement and selecting your desired installation options.
- When prompted to choose the installation directory, ensure that you select a location that differs from the previous installation directory to prevent any conflicts with residual files.
- Complete the installation process by following the remaining on-screen prompts, allowing the installer to copy necessary files and configure QuickBooks settings accordingly.
By meticulously following these steps, you can successfully reinstall QuickBooks, providing a fresh start that often resolves persistent errors such as QuickBooks Error 7300.
In instances where renaming the Intuit folder is met with denial due to active processes, additional steps may be necessary to circumvent this obstacle
Additional Solutions: End Related Processes
To regain control over the Intuit folder and proceed with the renaming process, it may be necessary to terminate any active processes associated with QuickBooks. Here’s how to accomplish this:
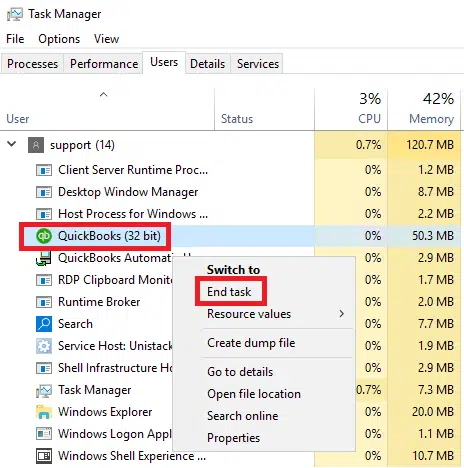
- Open the Task Manager utility by pressing Ctrl+Shift+Esc or right-clicking on the taskbar and selecting “Task Manager.”
- Navigate to the “Processes” tab within Task Manager, which provides a comprehensive list of all active processes running on your system.
- Locate any processes related to QuickBooks, such as “QBDBMgrN.exe,” in the list of running processes.
- Select the relevant processes and click on the “End Task” button to terminate them, freeing up system resources and allowing for the successful renaming of the Intuit folder.
With the associated processes terminated, you should now be able to proceed with renaming the Intuit folder as outlined in the previous steps, paving the way for a seamless QuickBooks reinstallation.
In conclusion
QuickBooks Error 7300 can be a formidable obstacle to business operations, but armed with a thorough understanding of its underlying causes and effective troubleshooting solutions, you can navigate through it with confidence. Whether creating a backup of the registry entry or opting for a complete reinstallation of QuickBooks, the key lies in perseverance and methodical execution. By following the detailed steps outlined in this guide, you can overcome QuickBooks Error 7300 and restore seamless functionality to your QuickBooks software or you can seek our QB Expert assistance at +1.800.579.9430 when needed to minimize the risk of data loss or disruption to your business operations.
FAQ’s
QuickBooks Error 7300 is a common issue encountered by users when attempting to access company data files. It often manifests during the setup of a new Windows operating system, causing QuickBooks to stop functioning and displaying error messages.
Symptoms of QuickBooks Error 7300 include difficulty opening company data files, abrupt crashes or freezes of the QuickBooks software, and pop-up error messages indicating Error 7300.
QuickBooks Error 7300 can be caused by various factors, including the failure of the Intuit Sync Manager, damage to QuickBooks files, incomplete installation of the software, or conflicts with other programs or system components.
Troubleshooting QuickBooks Error 7300 involves several steps, such as uninstalling and reinstalling QuickBooks, backing up registry entries, terminating related processes, and ensuring proper installation and configuration of the software.
Yes, many users can resolve QuickBooks Error 7300 on their own by following step-by-step guides and troubleshooting methods provided by Intuit or reputable online sources. However, complex cases may require professional assistance.
Yes, QuickBooks Error 7300 can pose a risk to company data as it may prevent users from accessing essential files and conducting business operations. It’s crucial to address the error promptly to mitigate any potential data loss or disruption.
QuickBooks Error 7300 can occur across various versions of the software, including QuickBooks Desktop and QuickBooks Online. The error is more commonly reported during the setup of a new Windows operating system.
Yes, antivirus software or firewalls may sometimes interfere with QuickBooks operations, leading to Error 7300. It’s recommended to configure antivirus exclusions or firewall permissions for QuickBooks to minimize such conflicts.
QuickBooks may experience conflicts with other software applications installed on the same system, potentially triggering Error 7300. It’s advisable to check for software compatibility issues and update or uninstall conflicting programs accordingly.
QuickBooks Error 7300 can recur if underlying causes, such as file corruption or incomplete installations, are not addressed adequately. However, following proper troubleshooting steps and preventive measures can help minimize the likelihood of recurrence and effectively resolve the error in the long term.