
Migrating to a new accounting software can be a daunting task, especially when it comes to important financial data. One of the most popular accounting software in the market is QuickBooks, which boasts of easy-to-use features to streamline accounting processes. However, QuickBooks Migration Failed Unexpectedly, causing frustration and delays in managing finances.
Moreover, there are several perspectives to consider when it comes to QuickBooks Migration Failures. From a business owner’s perspective, QuickBooks migration failure can lead to loss of trust in the software and increased pressure to find a more reliable accounting solution. From an accountant’s standpoint, QuickBooks migration failure can cause frustration and delays in managing financial data, resulting in potential errors and inaccuracies. This article will guide you to get rid of it in no time
What is the QuickBooks Migration Tool?

The QuickBooks Migration Tool is a specialized software utility developed by Intuit, the creators of QuickBooks, to facilitate smooth and hassle-free data migration between different versions of QuickBooks or other accounting platforms. Whether you’re upgrading to a newer version of QuickBooks or transitioning to a different accounting software altogether, the Migration Tool simplifies the process by automatically transferring your data, including company files, transactions, customer information, and more, with minimal manual intervention required.
Key Features and Benefits QuickBooks Migration Tool:
- Automated Data Transfer: The Migration Tool automates the process of transferring data from your existing QuickBooks installation to the desired destination, eliminating the need for manual data entry and reducing the risk of errors or discrepancies.
- Comprehensive Data Coverage: From company files and financial transactions to customer and vendor information, the Migration Tool ensures that all essential data is transferred accurately, preserving the integrity and continuity of your financial records.
- Cross-Platform Compatibility: Whether you’re migrating from QuickBooks Desktop to QuickBooks Online, or vice versa, the Migration Tool supports seamless data transfer across different platforms, ensuring a smooth transition without compatibility issues.
- Customization Options: The Migration Tool offers flexibility and customization options to tailor the migration process to your specific needs. You can choose which data to transfer, configure mapping settings, and schedule migrations at your convenience.
- Data Validation and Error Handling: Before finalizing the migration, the Migration Tool performs comprehensive data validation checks to ensure the accuracy and integrity of the transferred data. Any errors or discrepancies are flagged and can be addressed before completing the migration process.
How to Use the QuickBooks Migration Tool:
Using the QuickBooks Migration Tool is a straightforward process that can be completed in a few simple steps:
- Prepare Your Data: Before initiating the migration, ensure that your data is clean, organized, and free from any inconsistencies or errors. Backup your QuickBooks files to prevent data loss in case of unforeseen issues.
- Download and Install the Tool: Visit the QuickBooks website or your account dashboard to download the Migration Tool. Follow the on-screen instructions to install the software on your computer.
- Configure Migration Settings: Launch the Migration Tool and configure the migration settings according to your preferences. Select the source and destination QuickBooks versions or platforms, choose the data to transfer, and customize mapping settings as needed.
- Initiate the Migration: Once the settings are configured, initiate the migration process. The Migration Tool will automatically transfer your data from the source to the destination, displaying progress indicators and notifications throughout the process.
- Verify and Validate: After the migration is complete, review the transferred data to ensure accuracy and completeness. Perform validation checks to identify any errors or discrepancies that may require attention.
- Complete the Migration: Once you’re satisfied with the migrated data, finalize the migration process. The Migration Tool will prompt you to confirm and complete the transfer, ensuring that your new QuickBooks installation is up-to-date and ready for use.
Common Causes of QuickBooks Migration Failures:
- Data Integrity Issues: QuickBooks Migration Failed Unexpectedly often stem from data integrity issues. Even minor discrepancies or corruptions within the dataset can derail the migration process, resulting in unexpected errors. It’s crucial to ensure that the source data is clean, accurate, and free from any inconsistencies before initiating the migration.
- Incompatibility Between Versions: Migrating data between different versions of QuickBooks can pose compatibility challenges. Variations in database structures, file formats, or software functionalities between the source and destination versions may lead to QuickBooks Migration Failed Unexpectedly. It’s essential to verify compatibility and consider data conversion or upgrade options to ensure a smooth migration process.
- Insufficient System Resources: Inadequate system resources, such as insufficient RAM or processing power, can impede the migration process and cause it to QuickBooks Migration Failed Unexpectedly. Before initiating a migration, ensure that your system meets the minimum hardware requirements specified by QuickBooks. Upgrading hardware components if necessary can help prevent resource-related failures.
- Network Connectivity Issues: Fluctuations or interruptions in network connectivity during the migration process can disrupt data transfer and lead to QuickBooks Migration Failed Unexpectedly. It’s essential to prioritize a stable and reliable network connection when performing migrations. Consider scheduling migrations during off-peak hours to minimize the risk of network congestion or interruptions.
- Software Bugs or Glitches: Despite rigorous testing, QuickBooks software may contain bugs or glitches that manifest during the migration process, causing unexpected failures. Staying updated with the latest software patches and updates can help mitigate the risk of encountering software-related issues. Additionally, reporting any identified bugs to QuickBooks support can contribute to resolving them in future updates.
Troubleshooting QuickBooks Migration Failures Issue:
When users encounter the QuickBooks Migration Failed Unexpectedly Windows 11/10 or QuickBooks Migration Tool Not Working error, they should perform the following troubleshooting solutions
Note: Back up your essential data before fixing the migration tool failure issues. It will help prevent accidental data loss or mismatch in the conversion process.
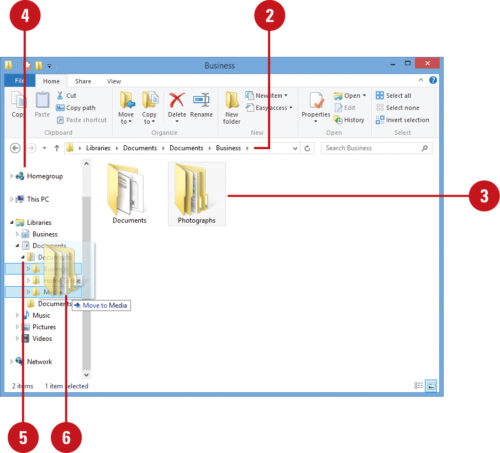
Step 1 -Moving the company file folder to another location
- Create a Backup: Before making any changes, create a backup of your company file to prevent data loss.
- Open QuickBooks: Launch QuickBooks and log in to your company file.
- Locate Company File: Navigate to the current location of your company file on your computer.
- Close QuickBooks: Close QuickBooks to ensure that no processes are accessing the company file.
- Copy Company File: Copy the company file (.qbw) along with its associated files and folders to the new location.
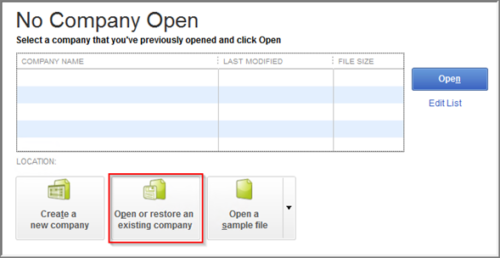
- Open QuickBooks: Relaunch QuickBooks and choose “Open or Restore an Existing Company” from the File menu.
- Select Company File: Navigate to the new location where you copied the company file and select it to open.
- Verify Data: Once the company file is opened successfully, verify that all data is intact and accessible.
- Test Functionality: Perform basic functions within QuickBooks to ensure that the migration was successful and that there are no issues with accessing or manipulating data.
- Regular Backups: Finally, establish a routine backup schedule to safeguard your company file against future migration failures or data loss events.
Step 2 -Restore Company file
- Backup Data: Before proceeding with any fixes, create a backup of your QuickBooks company files to prevent data loss.
- Access Company File: Launch QuickBooks and navigate to the “File” menu. Select “Open or Restore Company” and then “Restore a backup copy.”
- Locate Backup File: Browse your computer or external storage to locate the backup file (.qbb format) created earlier.
- Select Backup: Choose the backup file you want to restore and click “Open” to initiate the restoration process.
- Follow Prompts: Follow the on-screen prompts to specify the location for saving the restored company file.
- Complete Restoration: Once the restoration is complete, restart QuickBooks to access the restored company file.
- Verify Data: Double-check the restored company file to ensure that all data and transactions are intact and accurately transferred.
Step 3 -Repair the program files
- Close QuickBooks: Ensure QuickBooks is closed to prevent any conflicts during the repair process.
- Access Control Panel: Open the Control Panel on your computer.
- Navigate to Programs and Features: Find the “Programs and Features” or “Add or Remove Programs” option in the Control Panel.
- Locate QuickBooks: Scroll through the list of installed programs to find QuickBooks.
- Right-click and select “Repair”: Right-click on QuickBooks and choose the “Repair” option from the context menu.
- Follow on-screen prompts: Follow the prompts provided by the repair wizard to complete the repair process.
- Restart QuickBooks: Once the repair is complete, restart QuickBooks to apply the changes.
Step 4 -Troubleshoot compatibilty issue with QuickBooks
- Verify System Requirements: Ensure your system meets the minimum requirements for both the source and destination QuickBooks versions.
- Update QuickBooks: Install the latest updates for both versions to address any compatibility bugs or issues.
- Check File Formats: Ensure the file formats are compatible between the source and destination versions of QuickBooks.
- Use QuickBooks Conversion Tool: Utilize Intuit’s Conversion Tool, designed to assist with migrating data between different QuickBooks versions while resolving compatibility issues.
- Perform Test Migrations: Conduct test migrations with sample data to identify and address any compatibility issues before migrating critical data.
Step 5 -App Compatibility Troubleshoot Utility
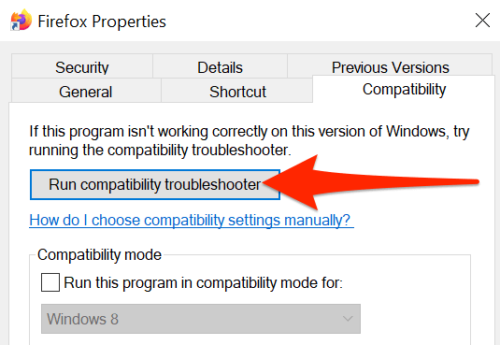
- Access Compatibility Troubleshooter: Right-click on the QuickBooks application icon and select “Troubleshoot compatibility” from the menu.
- Run Compatibility Troubleshooter: The troubleshooter will analyze the application and suggest compatibility settings based on your system configuration.
- Select Recommended Settings: Choose the option to apply the recommended compatibility settings for QuickBooks.
- Test Compatibility: Run QuickBooks to see if the migration issue persists. If the problem is resolved, proceed with the migration process.
- Adjust Compatibility Settings (if necessary): If the issue persists, you can manually adjust compatibility settings based on the troubleshooter’s recommendations or experiment with different compatibility modes.
- Reattempt Migration: Once compatibility settings are configured, attempt the QuickBooks migration process again to see if the issue is resolved.
- Monitor Migration Progress: Keep an eye on the migration process to ensure it completes successfully without any errors or failures.
Step 6 -Utilize intuit data protect plan

- Backup Data: Initiate a comprehensive backup of your QuickBooks data using Intuit Data Protect before attempting migration.
- Identify Migration Issue: Determine the specific problem encountered during the migration process, such as incomplete transfers or error messages.
- Access Intuit Data Protect: Log in to your Intuit Data Protect account and navigate to the backup and restore options.
- Select Backup: Choose the most recent backup of your QuickBooks data stored in Intuit Data Protect.
- Restore Data: Initiate the restoration process to retrieve the backup data and ensure it’s intact and accessible.
- Retry Migration: Once the backup data is restored successfully, attempt the QuickBooks migration process again.
- Monitor Progress: Keep an eye on the migration process to ensure it completes without encountering any errors or issues.
Step 7 -Uninstall any pending QB maintenance release update
- Open QuickBooks Desktop: Launch QuickBooks Desktop on your computer.
- Navigate to Help Menu: Click on the “Help” menu located at the top of the QuickBooks window.
- Select Update QuickBooks: From the dropdown menu, select “Update QuickBooks.”
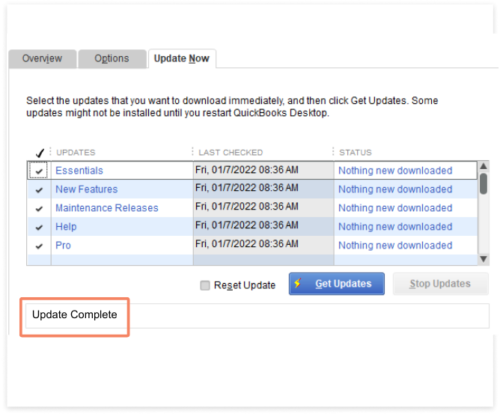
- Go to the Update Now Tab: In the Update QuickBooks window, navigate to the “Update Now” tab.
- Check for Pending Updates: Click on the “Get Updates” button to check for any pending maintenance release updates.
- Download and Install Updates: If updates are available, click on the “Download” button to initiate the download process. Once the download is complete, follow the on-screen instructions to install the updates.
- Restart QuickBooks: After installing the updates, close and reopen QuickBooks Desktop to ensure that the changes take effect.
Step 8 -Moving the QuickBooks Data folder
- Backup Data: Before proceeding, ensure to back up your QuickBooks data to prevent any potential data loss.
- Close QuickBooks: Close any open instances of QuickBooks on your system.
- Locate Data Folder: Find the current location of your QuickBooks data folder. Typically, it’s stored in the default location or a directory specified during installation.
- Create New Folder: Create a new folder in the desired location where you want to move your QuickBooks data.
- Copy Data: Copy all files and folders from the current QuickBooks data folder to the newly created folder.
Conclusion:
QuickBooks Migration Failed Unexpectedly can be frustrating, but with the right approach, they can often be resolved effectively. By following these steps and drawing on Intuit’s recommended troubleshooting strategies, you can address migration issues and ensure a smooth transition of your financial data. Remember to proceed with caution, back up your data regularly, and can seek our QB Expert assistance at +1.800.579.9430 when needed to minimize the risk of data loss or disruption to your business operations.